How to Make Distilled Water-Boiling Method
Our farm…it’s a work in progress and far from perfect.
One thing that’s missing is fresh water. I dream of having a well and drinking water that actually tastes good. Unfortunately, that will have to remain a dream…for now.
Currently, we live in the country but have city water. Thus, we have what is called “hard water”. I’m sorry to report that most homes here in the United States have hard water. Chances are good that you do too.
How can you tell if you have hard water?
While that nasty flavor is usually enough of a clue, hard water is easily identifiable by the crusty build-up it leaves around faucets and shower heads. Also, you may notice gray, yellow or rust-colored stains in your toilet bowl or around drains. The kind of stains that don’t go away with scrubbing.
Hard water is also the cause for spots on your newly washed stemware and glass baking dishes. All of this is caused by the minerals in hard water.
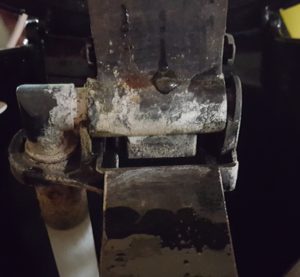
Here is what hard water deposits on a coffee pot look like….ewwww!
Not only do I refuse to drink water from the faucet, but I refuse to cook with it as well. That is, unless it’s been distilled first! Trust me when I tell you that there is a noticeable difference in the way everything tastes when using water straight from the tap!
Let’s face it, buying bottled water can get expensive!
And let’s not forget about all that plastic going into the landfill…just wrong and so avoidable! So if you’re tired of nasty tasting water, there is an easy solution. If you’re ready to get rid of hard water stains, you’ve come to the right place. I’m here to tell you that distilled water can alleviate many of the issues that hard water creates.
First, let me assure you there is no health risk associated with hard water. However, some people like to use chemicals to treat or “soften” their hard water. Adding tons of salt pellets may take care of the deposits and stains but I doubt it helps much with the taste. Besides, I’m sure those bags are heavy. So why do any heavy lifting if you don’t have to?
Out with the chemicals!
I choose not to use chemicals to treat our water. You see, I’m on a mission to remove chemicals from my home and replace them with healthier options. Naturally, this would apply to the one thing we use more than anything else…water. Maybe you feel the same way.
Learning how to make distilled water was super easy. And now that I know how, I regularly use it for drinking, cooking, in homemade cleaning products…even personal care products. And I’m going to share that process with you because I don’t want you breaking your back or spending money on plastic.
As I said, making distilled water is not difficult. Nor does it require much hands-on time. However, I want to clarify that the actual process to distill anything is much more involved than what I’m about to share with you. True distillation requires a totally different setup, equipment and process. For this purpose though, I’m all about EASY!
“Distilled” defined:
I am using the term “distilled” loosely to differentiate tap water from water that has been processed by boiling or steaming. You can read this post on steam distillation to learn more.
Now, if you’re ready to try the simple boiling method, get ready! I’m going to give you detailed instructions and you’ll want to pay close attention.
The Process:
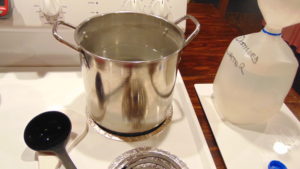
Step 1: Fill a large pan or stock pot with water. (Make sure you have more than what you think you’ll need. You’ll see why later)
Step 2: Heat the water to a low boil for about 20-30 minutes
Step 3: Let the water cool before pouring into a clean container, preferably overnight.
And there you have it…distilled water. Tough, wasn’t it?
But wait!
Please read carefully before you pour that boiled water into your container!
Unfortunately, boiling did not magically cause those nasty-tasting minerals to disappear. Instead, they settled in the bottom of the pan. Trust me, you do not want this sediment in your nice, clean container.
Here’s what you do:
First, remove the lid, if used, and let the condensation gently drain off. Do not disturb the water in the bottom of the pan. It’s important to avoid splashing or agitating the water.
If splashing occurs, simply let the water sit for another hour so the minerals can settle again.
Next, grab a ladle and channel your inner Skywalker. Very carefully, remove the water from the pan and pour it into your container of choice. Use a funnel, if needed. Your goal is to create as little disturbance in the water as possible. The Force is with you…be one with the Force water.
More importantly, be very careful not to touch the bottom of the pan or disturb the sediment. Ladle up as much water as you need to fill your clean container without touching the bottom of the pan. Chances are you won’t use all of the water in your stock pot and that’s okay. Actually, it’s preferable if you don’t use all the water. When you pour out the remaining water you’ll see why. All that sediment that settled in the bottom of your pan will be easily visible. Yuck
Told you it was simple!
Ideally, I like to keep a pitcher of distilled water in the fridge for drinking and cooking. I’ve also refilled plastic water bottles with the distilled water for on-the-go hydration. Thus, there are fewer bottles going into land fills and I feel good about that. You can also repurpose old milk jugs and mason jars. Just make sure you clean them thoroughly first.
Here’s a tip for you: Keep a jug of distilled water handy to use in your coffee pot. It cuts down on water deposits inside the coffee maker so you don’t have to clean it as often. I keep a separate jug of distilled water handy just for making coffee. We take our coffee-drinking seriously ’round here so it needs it’s own water jug!
If you would like to know how to clean hard water deposits from a coffee pot, check out this post on uses for white vinegar. It provides healthier alternatives for cleaning other areas of your home as well. As I stated earlier, I’m trying to remove chemicals from my home and commercial cleaning products are loaded with chemicals! So this is a good place to start.
Some final thoughts:
If you need a large volume of distilled water, the boiling process is the way to go. Alternatively, if you want distilled water sooner but don’t need as much, try the steam process.
Really, making your own distilled water makes sense. It saves money and cuts down on the amount of plastic that ends up in landfills. I know I sound like a broken record but it can’t be stressed enough. Not to mention, making distilled water means there is no need for chemicals! So, if these issues are a priority for you, then making distilled water will become your new, best habit.
I’d love it if you shared this information with someone you know who has a plastic bottle addiction. It shows love and concern, not just for them but for the planet as well. As always, I’d love to hear any comments or answer any questions you may have.
Until next time,
lisa
If you like what you see, click on the subscribe button so you don’t miss anything!
I promise not to spam you! By clicking the subscribe button, you agree to my privacy policy.


