Care for Garden Tools
Garden tools need regular care and maintenance in order to be effective. A few minutes of regular maintenance now will save hours of repair work later. Did you know that garden tools kept in good working order don’t need to be replaced as often? Go figure!
More importantly, cleaning your garden tools regularly helps prevent the spread of diseases from one plant to another. And yes, plants do carry diseases. The good news is that with regular cleaning and maintenance, disease is easily preventable.
Where to start when caring for garden tools:
First, it’s a good idea to replace any tool that is severely pitted or rusted. A tool that is rusted or not in good working order is a safety hazard. When a tool is not properly maintained, you have to work harder as well. Have you ever tried to cut something with a dull knife? It requires more effort on your part, right? Why make it harder for yourself?
Obviously, clean tools are much easier to use and maintain. Even if you plan to use the same tools the next day, clean them after each use. Get in that habit. We all know life happens. Something came up and you didn’t get back to the garden like you planned. As a result, the tools sat there for a couple of days. Or longer. Trust me, I’ve been there!
If your tools are in good condition, simply clean them and apply a light coat of oil. This should be enough to get them through an inactive winter season. I like to store my smaller tools in a bucket of oiled sand. This protects them from the elements and prevents rust.
If your tools are showing some signs of rust, you can follow the steps below to have them looking like new.
Supplies you might need:
White Vinegar or Turpentine
5 gallon bucket
Sand
Vegetable oil
Gloves
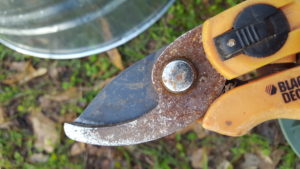
My favorite pair of pruning shears didn’t fare so well this winter. It appears that they were exposed to rain. I’m not pointing fingers (you know who you are) but this wouldn’t have happened if they had been stored properly. Just sayin’!
Start with a good cleaning:
Always start by cleaning your tools with soap and water. This applies even if you plan to use the tools again the next day. Washing removes dirt, germs and spores that cause disease and might get passed on to plants. That reason alone should be a good incentive to clean tools regularly. Rinse and dry the tool completely with a rag.
Next step: remove any rust:
Make rust removal easier by soaking the tool in vinegar. Now, I know there are products that are made specifically for getting rid of rust. These products may even work faster or better than vinegar. But these products are also full of chemicals.
If you’re anything like me, you will pass on using chemicals and instead opt for a natural alternative. The same goes for turpentine. Lots of folks swear that it’s great for removing sap or sticky residue. But again, it’s harsh to both humans and the earth. I’m here to help, not to judge…the choice is up to you.
Time for some elbow grease:
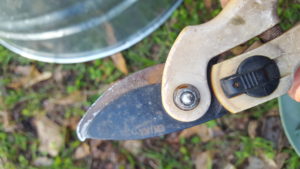
After soaking the tool in vinegar, use steel wool or a wire brush to remove any remaining rust. Although I have never tried it, I have read that 80 grit sandpaper will work as well. Steel wool is what I had on hand so it’s what I used. Rinse and dry the tool completely.
Give it a new edge:
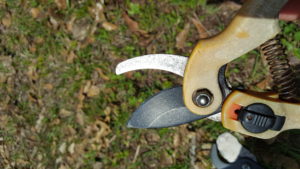
Now that your tool is clean and free of rust, it’s time for sharpening. For most garden tools, a 10″ flat metal file will do the trick. This is where you need safety glasses and gloves. Seriously! Metal splinters are nothing to joke about and you certainly don’t want one in your eye!
Work with the existing bevel on the tool. The bevel is the slightly slanted cutting edge. Make four or five passes with the file, going away from the cutting edge. Do not saw back and forth. Unless the cutting edge has major nicks or gouges, a few passes along the whole edge should be all you need.
Anything more than minor nicks should be handled by a professional or replaced altogether.
The finishing touch:
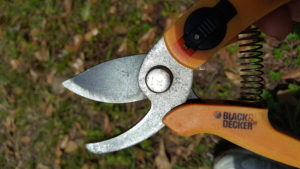
Your garden tool is now clean, rust-free and sharp. Good job!
All that’s left is:
- tighten any loose screws
- apply a thin coat of oil to protect against moisture (rust) and keep joints/hinges moving.
- if you have a wood handle, sand down any rough spots. Apply linseed oil to the wood handle and wipe clean with a rag.
Much better!
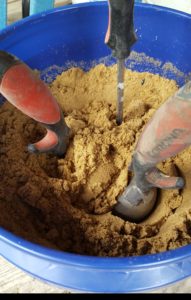
These pruners will go back into my sand bucket until I’m ready for them. It’s super easy to make your own sand bucket. Fill a 5 gallon bucket half full with sand. Add 2 or 3 cups of vegetable oil and mix so the oil is evenly distributed. The sand should look wet. If not, add more oil as needed and mix well.
Note: I’ve read that some people use motor oil, even used motor oil, in their sand bucket. I’m all about recycling but this is where I draw the line. Honestly, the thought of that motor oil being transferred to my garden (and my plants) just doesn’t sit well with me. Just like the other chemicals mentioned earlier in this post, this is a personal choice. So choose what works best for you, your garden and your conscience.
Sand buckets can be multi-taskers!
Your sand bucket can pull double duty. First, it stores and protects hand tools during the winter months. I like to leave mine in the sand bucket until I’m ready to use them again in the spring. Second, it can pass as a quick cleaning center for larger garden tools. If you’re short on time, you can push a shovel or spade into the oiled sand to give it a quick clean and protect it against moisture. The sand acts as an exfoliant by removing dirt. The oil protects against rust. When you have more time, you can go back and clean it properly. In a pinch, this will work and is better than not cleaning at all!
So, now you know how easy it is to clean and maintain your garden tools. You also know why it’s important to make this a habit. There should be no excuse for rusted or dirty tools living in your tool shed. And think of the money you save by not having to replace them every year!
Now, get out there and grow something. I’m sure it will be amazing!
Until next time,
lisa
Subscribe
If you like what you see, click on the subscribe button so you don’t miss anything!
I promise not to spam you! By clicking the subscribe button, you agree to my privacy policy.


